
Reporting
This chapter explains how to display changes and create reports.
Native Objects
The following options display changes in native objects.
Object Changes
To define the native data to display from the log, select option 1. Object Changes from the main menu. The Specify Data to Work With screen appears.
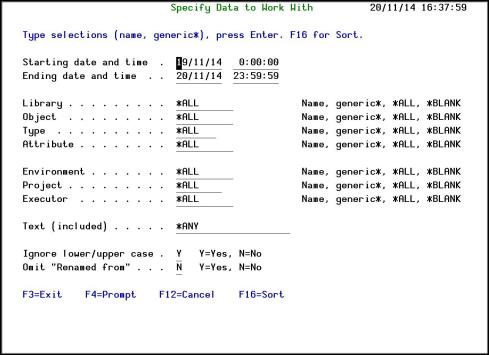
Figure 5-1. Specify Data to Work With Screen
|
Fields |
Description |
|
Starting date and time |
Starting date and time range for viewing the data log |
|
Ending date and time |
Ending date and time range for viewing the data log |
|
Library |
Library where the object is located Name, generic*, *ALL, *BLANK |
|
Object |
Object that was changed Name, generic*, *ALL, *BLANK |
|
Type |
Type of object Name, generic*, *ALL, *BLANK |
|
Attribute |
Different attributes of the object Name, generic*, *ALL, *BLANK |
|
Environment |
Environment where the project is running. Name, generic*, *ALL, *BLANK |
|
Project |
Project running in the environment. Name, generic*, *ALL, *BLANK |
|
Executor |
User that performed this operation. Name, generic*, *ALL, *BLANK |
|
Text (included) |
String of text that appears within the log. |
|
Ignore lower / upper case |
All matches regardless of letter case. Y=Yes; N=No |
|
Omit “Renamed from” |
You can choose to omit Rename changes Y=Yes; N=No |
|
Function Keys |
Description |
|
F4=Prompt |
Opens a list to select criteria for the above fields. |
|
F16=Sort |
Determine the order the information will be displayed by field. |
To set the sort sequence of the results, press F16 from the Specify Data to Work With screen. The Specify Sort screen appears.

Figure 5-2. Specify Sort
You can sort on any of the listed fields:
-
Date and time
-
Library
-
Object
-
Type
-
Attribute
-
Environment
-
Project
-
Executor
|
Fields |
Description |
|
Seq |
The order the fields will be sorted in. |
|
A/D |
Sort this field in Ascending or Descending order. |
|
Function Keys |
Description |
|
F16=Specify Data to Work With |
Return to the Specify Data to Work With screen to define the data filters. |
Enter the required parameters and press Enter. The Work with Native Objects - All Changes screen appears.
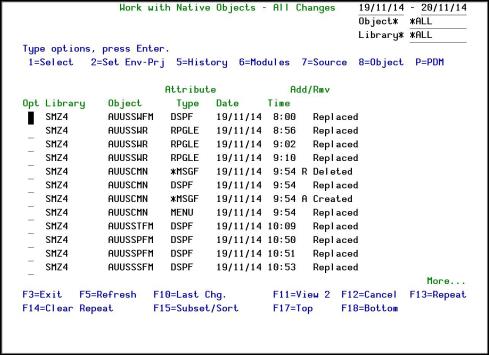
Figure 5-3. Work with Native Objects Changes Screen
|
Fields |
Description |
|
Library |
The source library and target (new) library. |
|
Object |
Object that was changed (as described in the Operation field) |
|
Type |
Type of the object |
|
Date |
Date the change was made |
|
Time |
Time the change was made |
|
Add/Rmv |
A=Object was added. R=Object was removed. |
|
Options |
Description |
|
1=Select |
Opens the Object Trace Information screen as described in Working with Object Trace Information. |
|
2=Set Env-Prj |
Opens the Set to Environment-Project screen as described in Working with Environment-Project. |
|
5=History |
Opens the Data to Work With screen, followed by the Work with History screen to view the selected object’s change history. Details are provided in Working with History. |
|
6=Modules |
Opens the Work with Modules screen to view the different modules contained in the object. Details are provided in Working with Modules. |
|
7=Source |
Opens the Work with Object Source screen to display the source of the object, compare it with other versions and restore the object source from the specified version. Details are provided in Working with Object Source. |
|
P=PDM |
Opens PDM screen as described in Source Members Changes. |
|
Function Keys |
Description |
|
F5=Refresh |
Refresh the list. |
|
F10=All/First/Last Changes |
Toggle to group and then sort by most earliest/latest or all changes. |
|
F11=View 1/2/3 |
Display additional information regarding the activities. |
|
F13=Repeat |
Repeat last option (example 1 to select). |
|
F14=Clear Repeat |
Clear the repetition from the cursor location downward on the list. |
|
F15=Subset/Sort |
Returns to the Specify Data to Work With filter screen to allow a narrowing down of the list of objects to track. |
|
F17=Top |
Top of list |
|
F18=Bottom |
Bottom of list |
From the Work with Native Objects - All Changes screen, select one or more objects by typing 1 next to them and pressing Enter. The Object Trace Information screen appears.
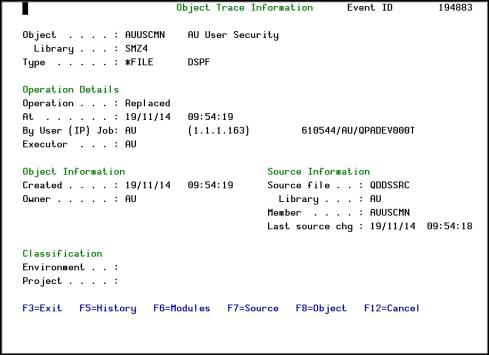
Figure 5-4. Object Trace Information Screen
|
Fields |
Description |
|
Object |
Object that was changed (as described in the Operation field) |
|
Library |
The source library and target (new) library. |
|
Type |
Type of the object |
|
Operation Details |
|
|
Operation |
Operation type (for example, moved, deleted, and so on) |
|
At |
Date and time |
|
By User (IP) Job |
User, IP, and job information |
|
Executor |
User that performed this operation. |
|
Object Information |
|
|
Created |
Time and date the object was created |
|
Owner |
Owner of the object |
|
Authority Used |
For programs - type of authority used. *USER/*OWNER |
|
Modules |
For programs - number of modules. |
|
Classification |
|
|
Environment |
Environment to which the object belongs. |
|
Project |
Project to which the object belongs |
|
Source Information |
|
|
Source file |
Location of the source file |
|
Library |
Library where the source file is located |
|
Member |
Name of the member of the object |
|
Last Source Change |
Last date and time the source used to create the object was changed |
|
Function Keys |
Description |
|
F5=History |
Opens the Work with History Changes screen. |
|
F6=Modules |
Searches for Modules for this object. |
|
F7=Source |
Opens the Work with Object Source screen. |
Working with Environment-Project
To reassign the changed objects to a different environment/project. Select 1. Object Changes from the main menu. The Specify Data to Work With screen appears.
Figure 5-5. Specify Data to Work With Screen - Environment/Project
|
Fields |
Description |
|
Starting date and time |
Starting date and time range for viewing the data log |
|
Ending date and time |
Ending date and time range for viewing the data log |
|
Library |
Library where the object is located Name, generic*, *ALL, *BLANK |
|
Object |
Object that was changed Name, generic*, *ALL, *BLANK |
|
Type |
Type of object Name, generic*, *ALL, *BLANK |
|
Attribute |
Different attributes of the object Name, generic*, *ALL, *BLANK |
|
Environment |
Environment where the project is running. Name, generic*, *ALL, *BLANK |
|
Project |
Project running in the environment. Name, generic*, *ALL, *BLANK |
|
Executor |
User that performed this operation. Name, generic*, *ALL, *BLANK |
|
Text (included) |
String of text that appears within the log. |
|
Ignore lower / upper case |
All matches regardless of letter case. Y=Yes; N=No |
|
Omit “Renamed from” |
You can choose to omit Rename changes Y=Yes; N=No |
|
Function Keys |
Description |
|
F4=Prompt |
Opens a list to select criteria for the above fields. |
|
F16=Sort |
Determine the order the information will be displayed by field. |
To display the selected items. press Enter. The Work with Native Objects screen appears.
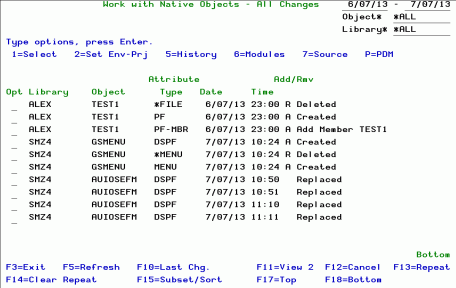
Figure 5-6. Work with Native Objects - All Changes Screen
NOTE: Fields, options and function keys are similar to those described in Figure 5-3.
Choose 2=Set Env-Prj for the changed objects that you want to reassign. The Set to Environment-Project screen appears.
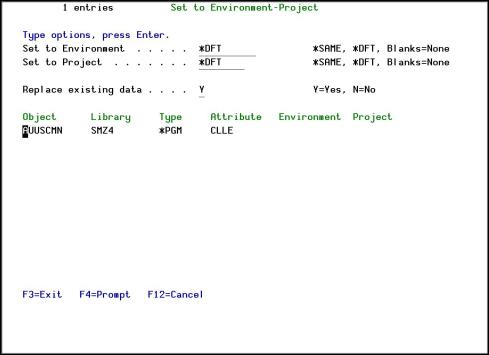
Figure 5-7. Set to Environment-Project Screen
|
Fields |
Description |
|
Set to Environment |
Assign the changed object to the Environment. *SAME, *DFT, Blanks = None |
|
Set to Project |
Assign the changed object to the Project. *SAME, *DFT, Blanks = None |
|
Replace Existing data |
Replaces the name of the Environment/Project the changed object was assigned to. |
|
Object |
Object that was changed |
|
Library |
Library where the object is located |
|
Type |
Type of object. |
|
Attribute |
Different attributes of the object |
|
Environment |
Environment the project is currently assigned to |
|
Project |
Project the project is currently assigned to |
|
F4 Prompt |
Prompts to select existing Environments/Projects from a list. |
Working with History
To work with History:
-
Select 1. Object Changes from the main menu and press Enter. The Specify Data to Work With screen opens.
-
Enter the relevant criteria and press Enter. The Work with Native Objects screen appears.
-
Choose 5=History forthe changed objects whose history you want to view. The Work with History Changes screen appears.
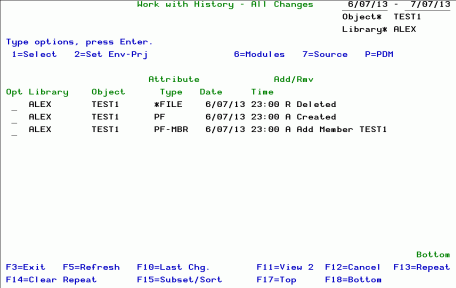
Figure 5-8. Work with History - All Changes Screen
|
Fields |
Description |
|
Library |
The name of the library |
|
Object |
The name of the object |
|
Type |
Type of the object |
|
Date |
Date the change was made |
|
Time |
Time the change was made |
|
Add/Rmv |
A=Object was added. R=Object was removed. |
|
Options |
Description |
|
1=Select |
Opens the Object Trace Information screen as described in Working with Object Trace Information. |
|
2=Set Env-Prj |
Opens the Set to Environment-Project screen as described in Working with Environment-Project. |
|
6=Modules |
Opens the Work with Modules screen to view the different modules contained in the object. Details are provided in Working with Modules. |
|
7=Source |
Opens the Work with Object Source screen to display the source of the object, compare it with other versions and restore the object source from the specified version. Details are provided in Working with Object Source. |
|
P=PDM |
Opens PDM screen as described in Source MembersChanges. |
|
Function Keys |
Description |
|
F5=Refresh |
Refresh the list. |
|
F10=First/Last Change |
Toggle to group and then sort by most earliest/latest change. |
|
F11=View 1/2/3 |
Toggle to display additional information. |
|
F13=Repeat |
Repeat last option (example 1 to select). |
|
F14=Clear Repeat |
Clear the repetition form the cursor location downward on the list. |
|
F15=Subset/Sort |
Returns to the Specify Data to Work With filter screen to allow a narrowing down of the list of objects to track. |
|
F17=Top |
Top of list |
|
F18=Bottom |
Bottom of list |
Working with Modules
The Work with Modules screen is accessed using option 6 from the Work with Native Object Changes screen (See Work with Native Objects).
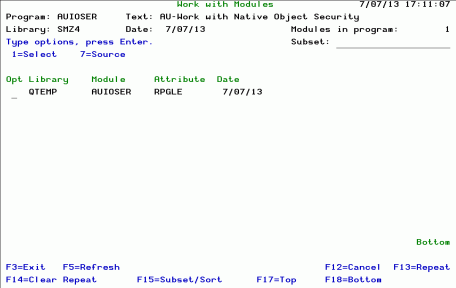
Figure 5-9. Work with Modules Screen
|
Fields |
Description |
|
Subset |
Type subset to filter for. |
|
Library |
Name of the library. |
|
Module |
Name of the module |
|
Attribute |
Different attributes of the object |
|
Date |
Date the change was made |
|
Options |
Description |
|
1=Select |
Opens the Module Information screen to display additional information about the selected module. |
|
7=Source |
Opens the Module Source screen to display the source and allow comparison with other versions. |
|
Function Keys |
Description |
|
F5=Refresh |
Refresh the list. |
|
F13=Repeat |
Repeat last option (example 1 to select). |
|
F14=Clear Repeat |
Clear the repetition form the cursor location downward on the list. |
|
F15=Subset/Sort |
Returns to the Specify Data to Work With filter screen to allow a narrowing down of the list of objects to track. |
|
F17=Top |
Top of list |
|
F18=Bottom |
Bottom of list |
Working with Object Source
The Work with Object Source screen is accessed using option 7 from the Work with Native Objects Changes screen as described in Work with Native Objects. Some options are inherited from that screen.
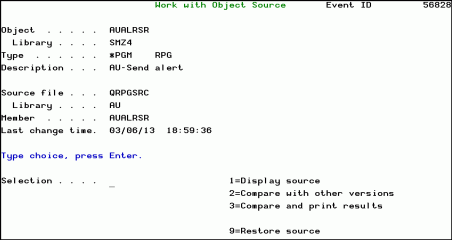
Figure 5-10. Work with Object Source Screen
|
Field |
Description |
|
Object |
Object that was changed |
|
Library |
Library where the object is located |
|
Type |
Type and attribute of the object |
|
Description |
Description of the object |
|
Source file |
Source file of the object |
|
Library |
Library where the source file is located |
|
Member |
Name of the member. |
|
Last Change Time |
Last date and time the source was changed. |
|
Selections |
Description |
|
1=Display Source |
Opens the actual source file to browse the program. |
|
2=Compare with other versions |
|
|
3=Compare and print results |
Opens a list to select the object source to compare to and then print the results. |
|
9=Restore Source |
Restores the saved source. |
Source Member Changes
To define the source member changes to view from the log, select 2. Source Member Changes from the main menu. The Specify Data to Work With screen appears.
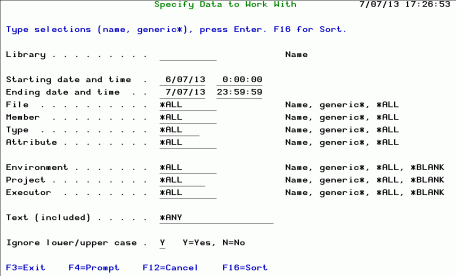
Figure 5-11. Specify Data to Work With Screen for Source Members Changes
|
Fields |
Description |
|
Library |
Library where the object is located Name, generic*, *ALL, *BLANK |
|
Starting date and time |
Starting date and time range for viewing the data log |
|
Ending date and time |
Ending date and time range for viewing the data log |
|
File |
File that was changed Name, generic*, *ALL, *BLANK |
|
Member |
File member |
|
Type |
Type of object Name, generic*, *ALL, *BLANK |
|
Attribute |
Different attributes of the object Name, generic*, *ALL, *BLANK |
|
Environment |
Environment where the project is running. Name, generic*, *ALL, *BLANK |
|
Project |
Project running in the environment. Name, generic*, *ALL, *BLANK |
|
Executor |
User that performed this operation. Name, generic*, *ALL, *BLANK |
|
Text (included) |
String of text that appears within the log. |
|
Ignore lower / upper case |
All matches regardless of letter case. Y=Yes; N=No |
|
Function Keys |
Description |
|
F4=Prompt |
Opens a list to select criteria for the relevant fields. |
|
F16=Sort |
Determine the order the information will be displayed by field. |
Work with Members History
From the Work with Native Objects screen, select one or more objects by typing 1 next to them and pressing Enter.
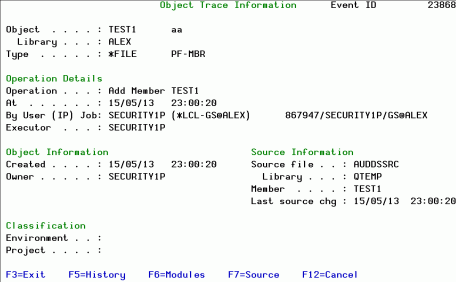
Figure 5-12. Member Trace Information Screen
|
Fields |
Description |
|
Operation Details |
|
|
Operation |
Operation type (for example, moved, deleted, and so on) |
|
At |
Date and time |
|
By User (IP) Job |
User, IP, and job information |
|
Executor |
User that performed this operation. |
|
Object Information |
|
|
Object |
Environment to which the object belongs. |
|
Library |
Project to which the object belongs |
|
Created |
Time and date the object was created |
|
Owner |
Owner of the object |
|
Classification |
|
|
Environment |
Environment to which the object belongs. |
|
Project |
Project to which the object belongs |
|
Function Keys |
Description |
|
F7=Source |
Opens the Work with Object Source screen as shown below. |
Work with Member Source
The Work with Object Source screen is accessed from the Work with Native Objects Changes screen (F7) as described in Work with Members History .
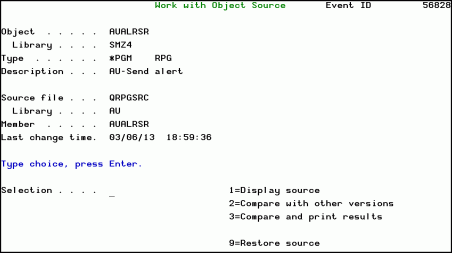
Figure 5-13. Work with Member Source Screen
|
Field |
Description |
|
Source file |
Source file of the object |
|
Library |
Library where the object is located |
|
Member |
Name of the member. |
|
Type |
Type of the object |
|
Attribute |
Attribute of the object |
|
Description |
Description of the object |
|
Library |
Library where the source file is located |
|
Last Change Time |
Last date and time the source was changed. |
|
Selections |
Description |
|
1=Display Source |
Opens the actual source file to browse the program. |
|
2=Compare with other versions |
|
|
3=Compare and print results |
Opens a list to select the object source to compare to and then print the results. |
|
9=Restore Source |
Restores the saved source. |
Comparing with Other Versions
To compare the source of objects with other versions, enter 8 inte Opt field for those objects on the Work with Members - Al Changes screen.
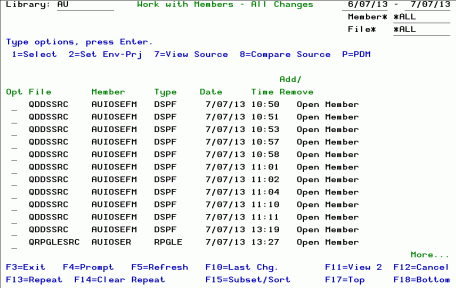
Figure 5-14. Work With Members Changes Screen
The Work with Object Source screen opens displaying detailed changes.

Figure 5-15. Work with Object Source Screen
NOTE: Other operations are performed in a similar manner to Native Objects.
IFS Objects
IFS Changes
To work with IFS changes, select 11. IFS Changes from the Main menu. The IFS Changes (Specify Data to Work With) appears.

Figure 5-16. Specify Data to Work With Screen

Figure5-17.Work with IFS Object Changes
F22 displays the complete path to the object.
To view the complete object link, move your cursor to the desired object and press F22. The Work with IFS Object Changes (Links) screen appears.

Figure 5-18. Work with IFS Objects Changes - Link
To view the IFS Object Trace information, select an object by typing 1 next to the object and pressing Enter. The IFS Object Trace Detailed Information screen appears.

Figure 5-19. IFS Object Trace Detailed Information
Working with IFS Object Links
To change environment and projects in the logs for one or more objects, select them by typing 2 next to them and pressing Enter. The Work with IFS Objects Changes screen appears.

Figure 5-20. Work with IFS Objects Changes Screen
|
Fields |
Description |
|
Object |
Object that was changed (as described in the Operation field) |
|
Directory |
The directory where the IFS object is stored |
|
Type and Attribute |
Type and attribute of the object |
|
Operation |
What happened to the object (for example, moved, deleted, and so on) |
|
Performed by |
User that made the change |
|
Date-time |
When the change was made |
|
Job |
Job that made the change |
|
IP Address |
The computer on which the change was made |
|
Created |
Time and date the object was created |
|
Options |
Description |
|
1=Select |
Displays the IFS Object Trace Information screen. |
|
2=Set Prj-Tsk |
Displays the Set to Project-Task screen |
|
Function Keys |
Description |
|
F5=Refresh |
Refresh the list. |
|
F10=First/Last Change |
Toggle to group and then sort by most earliest/latest change. |
|
F11=View 1/2/3 |
Toggle to display additional information. |
|
F13=Repeat |
Repeat last option (example 1 to select). |
|
F14=Clear Repeat |
Clear the repetition form the cursor location downward on the list. |
|
F15=Subset/Sort |
Returns to the Specify Data to Work With filter screen to allow a narrowing down of the list of objects to track. |
|
F17=Top |
Top of list |
|
F18=Bottom |
Bottom of list |
Queries and Reports
Change Tracker offers powerful functions included from the Audit product:
-
41. Queries and Reports
-
81. System Configuration
-
82. Maintenance Menu
Before installing Change Tracker, be sure to download Audit, as the SMZ4 libraries are required for Change Tracker.
For a full explanation of the functionalities common to Audit, please see the latest version of the Audit User Manual.