Starting to work with iSecurity Antivirus for AIX
Pre-Requisites
-
Supported AIX platforms: IBM AIX 7.2 TL5 SP7 or later, IBM AIX 7.3 or later.
To ensure compatibility with the supported platforms, you can verify your AIX version using the following command:
oslevel -s
This command returns a four-part string, e.g. 7200-05-07-2346, where:
7200 - AIX Version 7.2
05 - Technology Level 5 (TL5)
07 - Service Pack 7 (SP7)
2346 - Built in week 46 of 2023.
To format the output into a simpler form, use:
oslevel -s | awk -F- '{printf "AIX %.1f TL%d SP%d\n",$1/1000,$2,$3}'
Output: AIX 7.2 TL5 SP7
-
Disk space: /home should have 2.5 GB free.
-
During installation: Additional 1.5 GB free is needed (in the download directory).
-
During upgrading: Additional 500 MB is needed.
-
-
Minimum RAM: 1.7 GB.
-
Signatures download:
-
From iSecurity server: Firewall should allow input from av.razlee.com (currently 74.208.236.138).
-
The IP address might be changed in the future.
-
-
Via SSL, SSL Certificates for Antivirus signatures download:
-
For the first time: install the ca-certificates package by dnf or yum:
-
yum install ca-certificates
-
dnf install ca-certificates
-
-
-
-
Web interface:
-
Java runtime version 8, or higher.
-
Web application server that supports Jakarta EE: Tomcat 10, WebSphere Application Server Liberty, etc.
-
Installing
On the AIX command line enter:
-
Log in as root.
-
cd <download directory>
-
To download the installer:
via wget:
wget --output-file=wget.log --timestamping --show-progress
https://as400.razlee.com/products/AIX/AV/AV-V1.0.1-installer.bin.bz2
via PC web browser download to the PC:
https://as400.razlee.com/products/AIX/AV/AV-V1.0.1-installer.bin.bz2
copy file AV-V1.0.1-installer.bin.bz2 to the <download directory>
-
cd <download directory>
-
/opt/freeware/bin/bzip2 -tdvv AV-V1.0.1-installer.bin.bz2
-
chmod 700 AV-V1.0.1-installer.bin
-
./AV-V1.0.1-installer.bin
Running installer.bin installs Antivirus in the /home/SMZVDTA directory.
NOTE: Antivirus installation and configuration add special mounts (namefs mount) directories to the file system. The directories are under the /SMZV directory. These mount commands run online and also added to /etc/inittab, to keep the mounts during reboot. Uninstalling Antivirus removes the mounts from both online and the /etc/inittab file.
Uninstalling
On the AIX command line enter:
-
/avmenu
The Antivirus main menu appears. -
Select 6. Remove AV from computer (uninstall AV) from the Configuration menu.
Uninstalling removes namefs directories and statements in /etc/inittab that were added during installation and configuration of Antivirus.
Configuring
On the AIX command line enter:
-
/avmenu
The Antivirus main menu appears. -
Select 1. Configuration
The Configuration menu appears. -
To define how to send the email notifications:
-
Select 1. AV Configuration
An editor opens av.conf -
Set values for the parameter emailTo (administrators that will receive the notifications) and the SMTP definitions: emailSMTP, emailPort, and emailUser
-
Save and exit the editor.
-
Select 2. Enter password of Antivirus email user
Enter the password of the Antivirus email user defined in SMTP definitions. -
Select 5. Test email setting
Check that the administrators, defined in the emailTo parameter, receive the test email.
-
-
To define the directories to be scanned On-Access, select 1. AV Configuration from the Configuration menu. Set at least one includePrefix value.
For example, if you set includePrefix /home/e, Antivirus On-Access will scan paths with the prefix /home/e
NOTE: Do not touch the includePrefix /tmp/eicar.com statement, it is used to test Antivirus.
Refreshing Antivirus Signatures
On the AIX command line enter:
-
/avmenu
The Antivirus main menu appears. -
Select 4. Refresh signatures
The Refresh signatures menu appears.
-
Select:
-
If the AIX has access to the Internet:
-
Use option 1. Refresh signatures from iSecurity site
-
-
Else (if the AIX does not have access to the Internet):
-
Either
-
Use the option 3. Refresh signatures from Lan, AV config <lanUrl>
-
-
or
-
Use the options 4. Refresh signatures from Dir, AV config <RefreshDir>
-
-
For details please contact Razlee iSecurity Support at support@razlee.com
-
-
-
Select 5. Display current signatures to check that the signature files bytecode.cvd, daily.cvd and main.cvd have been downloaded and updated.
Activating On-access
On the AIX command line enter:
-
/avmenu
The Antivirus main menu appears. -
Select 2. On-access activation
-
Select 1. Start AV on-access
It may take a few minutes to load the signatures. -
Select 3. AV on access Status
Repeat until it shows Status Active
Testing On-Access
NOTE: The EICAR Anti-Virus Test File or EICAR.com test file is a computer file that was developed by the European Institute for Computer Antivirus Research (EICAR) and Computer Antivirus Research Organization (CARO) to test the response of computer antivirus programs. Instead of using real malware, which could cause real damage, this test file allows people to test anti-virus software without having to use a real computer virus.
For a general test, on the AIX command line enter:
-
/avmenu
The Antivirus main menu appears. -
Select 4. Test AV on access
You should receive an email about finding a test virus.
To test that On-Access works on another directory:
-
/avmenu
The Antivirus main menu appears. -
Select 1. Configuration
The Configuration menu appears. -
Select 4. Create virus file for test
A demo virus is created as /SMZV/home/SMZVDTA/virus-for-test/eicar.com -
Use a bash command line to copy it to a directory that was specified as includePrefix on the configuration file.
-
Touch the file by: cat target_directory/eicar.com.
-
The bash response should be : cat: 0652-050 Cannot open...
You should receive an email about finding a test virus.
If the On-Access test fails, see Configuring and repeat the steps specified there regarding the setup of includePrefix and email.
Deactivating On-access
On the AIX command line enter:
-
/avmenu
The Antivirus main menu appears. -
Select 2. End AV on-access
Testing On-Demand
To test the On-Demand, on the AIX command line enter:
-
/avmenu
The Antivirus main menu appears. -
Select 2. End AV on-access
-
Select 1. Configuration
The Configuration menu appears. -
Select 4. Create virus file for test
A demo virus is created as /home/SMZVDTA/virus-for-test/eicar.com -
Copy the eicar.com file from /SMZVDTA to the target directory that you want to scan.
-
/scanav target_directory
The administrators should receive an email that summarizes the scanning.
On-Demand Scanning
Check the parameters of scanav with the /scanav --help command.
Use /scanav target_directory with your selected parameters
The administrators should receive an email that summarizes the scanning.
The Functionality of ”onlyNew”
onlyNew is an important advantage of iSecurity Antivirus. When it is set, files that have been scanned will not be scanned again until they have changed.
NOTE: To use the onlyNew function, the file system EAformat has to be v2.
Changing the EAformat of the file system to v2 is permanent. This change cannot be revoked.
The onlyNew attribute for a file or directory is kept:
-
When you move a the file or directory.
-
When you use “tar –cU” or “tar –xU”
For On-Access, set the onlyNew to be Y in the configuration file. On-Access will only scan files that have been modified since their last scan.
For On-Demand, when you run /scanav, add the --only-new flag.
Why You Need "onlyNew"
onlyNew is identical in On-Demand and On-Access detections and provides significant CPU savings. If one wishes to send the same file to 1,000 clients, iSecurity Antivirus for AIX will scan it just once, not 1,000 times.
The onlyNew parameter enables:
-
ReScanRlsUpg(N): if onlyNew=Y, Rescan file after AV Release Upgrade. A major product upgrade may bring new methods for virus detection. Setting to Y will force rescan.
-
ReScanImportFile (N): if onlyNew=Y, Rescan file that was imported from another AIX. The system hangs up during the installation of new products or releases as the AV has to check all the imported files. The onlyNew parameter enables not scanning files that were scanned on a different system in the organization. The transfer has to be done using "tar –cU" or "tar –xU".
A new feature was also implemented to bolster security and prevent hackers from bypassing the onlyNew feature by altering the file's last change date. Any such attempt triggers a rescan, ensuring the integrity of the system. Attaching the file stamp to a different file will also cause a rescan.
Deploying Web Interface
Download the web archive from:
https://as400.razlee.com/products/AIX/AV/WebApp/av.war
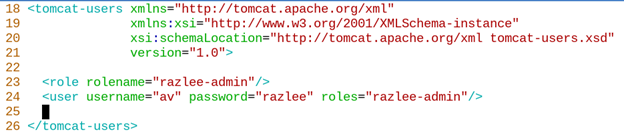
Edit the file: tomcat_directory/conf/tomcat-users.xml
Add these two lines:
<role rolename="razlee-admin"/>
<user username="av" password="razlee" roles="razlee-admin"/>
NOTE: the user name av and password razlee are an example. Change them to appropriate values.
The tomcat-users section of the file should look like this:
Copy the av.war file to the tomcat_directory/webapps directory
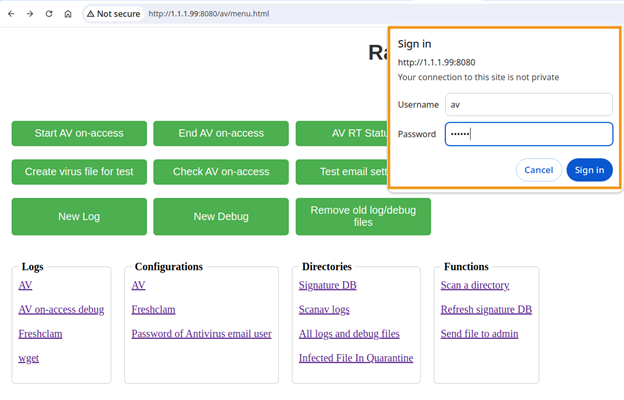
Open http://AIX-IP-ADDRESS:8080/av/menu.html in your browser.
When prompted enter 'av' as username and 'razlee' as password or the values with which you have replaced them: