
Change Tracking Methods
Change Tracker users select one of two methods to track changes in the system. Both methods require minimum resources.
-
Real Time Mode is the preferred method as it records the information about the event which caused the change (who, when, from where) in addition to the details of the change.
-
Periodic Mode records only the changes.
Each Library and Folder may be set to use only one of the methods.
Enabling Change Tracking
To enable Change Tracker to run, select option 81. System Configuration from the main menu and then select 1. Activation Mode. Perform the steps described in Activation Mode.
Scope of Tracking
Libraries
The Work with Libraries screen defines which native objects libraries should be controlled and the attributes of the controls.
To define the Libraries to control, select 1. Librariesfrom the General Definitions menu. The Work with Libraries screen appears.
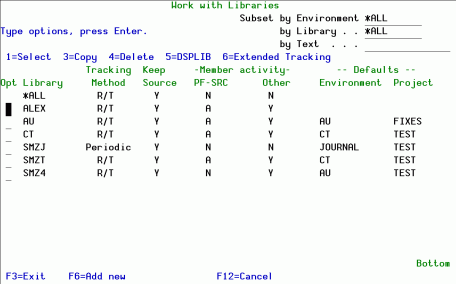
Figure 3-4. Work with Libraries Screen
See Adding or Modifying a Library for a detailed descriptions of the fields.
|
Options |
Description |
|
1=Select |
Select a definition of a library to work with. |
|
3=Copy |
Copy a definition of a library. |
|
4=Delete |
Delete a definition of a library. |
|
5=DSPLIB |
Display the library contents. |
|
6=Extended Tracking |
Specify extended tracking options for the library. |
|
Function Keys |
|
|
F6=Add new |
Adds a new library. |
The displayed list of libraries can be filtered further by subsets of Environment, Library, and Text. For example, if the characters MZ are entered in the subset by library, only libraries containing the string MZ will be displayed.
Adding or Modifying a Library
To modify or add a new library, open a screen from the Work with Libraries screen. The appropriate screen appears.
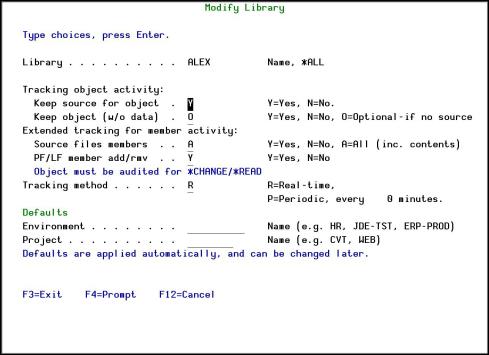
Figure 3-5. Modify Library Screen
|
Field |
Description |
|
Library |
Name of library. *ALL. This definition applies to any library which is not specifically mentioned. |
|
Tracking object activity |
This area refers to activities that are tracked when a change to the object occurs. |
|
Keep source for object |
The source is kept in a compressed mode and can later be restored with the same source change date and time. The source is kept only if the last source change date and time is identical to the one used to create the object. If the object was created in a different system, then, if the source change date and time are identical in the source available on the current system it will be kept.
|
|
Keep object (w/o data) |
|
|
Extended tracking for member activity |
Source and data files member activity can be tracked separately from tracking the object activity. In order to track member activity, the file must be set for auditing. |
|
Source files members |
Specifies activities to be performed on source files.
|
|
PF/LF member add/rmv |
Specifies activities to be performed for changes made to data files. Such changes can be adding/removing of members or triggers.
|
|
Tracking Method |
Specifies the method by which changes are tracked.
|
|
Defaults |
Specifies defaults assigned to changes made in this library. |
|
Environment |
Assign the changed libraries to the environment. |
|
Project |
The objects in this library will be marked as part of the specified project. |
|
Function Keys |
Description |
|
F4=Prompt |
Opens a list to select one or more libraries. |
While tracking changes in a general software library has great importance, tracking changes in the OS (Operating System) and related software product libraries may have an even higher significance. Changes to such programs are called PTF (Program Temporary Fix) and are manipulated by IBM PTF related commands.
Change Tracker can track the actual activity that occurs in software product libraries and identify the license program and PTF ID these changes are related to.
To work with PTF definitions, select 2. PTF from the GeneralDefinitions menu. The Work with PTF Definition screen appears.
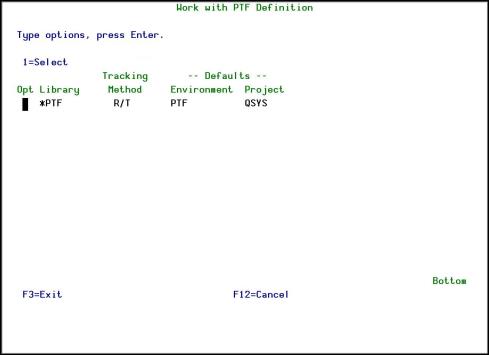
Figure 3-6. Work with PTF Definition Screen
|
Options |
Description |
|
1=Select |
Modify the PTF definition. |
Modifying PTF Definition
To modify a PTF definition, type 1 next to the *PTF definition in the Work with PTF Definition screen and press Enter. The Modify PDF Definition screen appears.
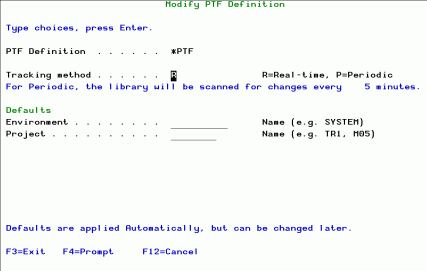
Figure 3-7. Modify PTF Definition Screen
|
Field |
Description |
|
Tracking Method |
Specify by which method the changes will be tracked:
|
|
Defaults |
|
|
Environment |
Environment the PTF is running in. |
|
Project |
Project running in the environment. |
|
Function Keys |
Description |
|
F4=Prompt |
Opens a prompt screen to select 1 or more PTF definitions. |
IFS Directories
To work with IFS directories, select 5. IFS Directories from the General Definitions menu. The Work with IFS Directories screen appears.
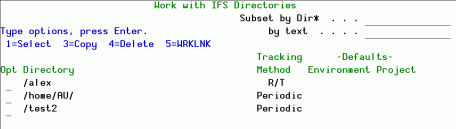
Figure 3-8. Work with IFS Directories Screen
|
Field |
Description |
|
Subset |
Filter by: Dir* (directory) Text |
|
Options |
Description |
|
1=Select |
Modify an existing IFS directory. |
|
3=Copy |
Copy the chosen directory.
|
|
4=Delete |
Delete an existing IFS directory. |
|
5=WRKLNK |
Runs the Work with Object Links Command. |
|
Function Keys |
Description |
|
F6=Add new |
Add a new IFS directory. |
Adding or Modifying an IFS Directory
In the Work with IFS Directories screen, select the directory you want to change, type 1 and press Enter, or press F6 to define a new directory. The appropriate screen appears.
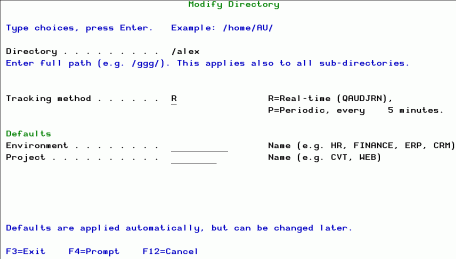
Figure 3-9. Modify IFS Directory Screen
|
Field |
Description |
|
Directory |
IFS directory path |
|
Tracking Method |
Specifies the method by which changes are tracked.
|
|
Defaults |
Specifies defaults assigned to changes made in this directory. |
|
Environment |
Assign the changed directories to the environment. |
|
Project |
The objects in this directory will be marked as part of the specified project. |
|
Function Keys |
Description |
|
F4=Prompt |
Opens a prompt screen to select 1 or more IFS directories. |
IFS Directories to Exclude
To exclude IFS directories from the scan, select 6. IFS Directories to Exclude from the General Definitions menu. The Work with IFS Directories to Exclude screen appears.

Figure 3-10. Work with IFS Directories to Exclude Screen
|
Field |
Description |
|
Directory |
IFS directory path |
|
Text |
User-entered description of directory. |
|
Subset |
Filter by directory or by a string in the text description. |
|
Options |
Description |
|
1=Select |
Modify an existing IFS directory. Perform the steps described in Adding or Modifying an IFS Directory to Exclude on page 24. |
|
4=Delete |
Exclude the chosen IFS directory from tracking. |
|
Function Keys |
Description |
|
F6=Add new |
Add a new IFS directory to exclude from tracking. |
|
F22=Displayentire directory |
Displays all objects in the directory. |
Adding or Modifying an IFS Directory to Exclude
To exclude directories from being tracked: In the Work with IFS Directories to Exclude screen, select the directory you want to change, type 1 and press Enter, or press F6 to define a new directory. The appropriate screen appears.
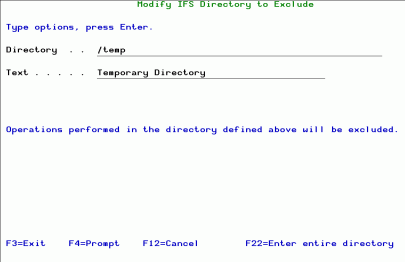
Figure 3-11. Modify IFS Directory to Exclude Screen
|
Field |
Description |
|
Directory |
IFS directory path |
|
Text |
User-entered description of directory. |
|
Subset by directory |
Filter by directory name. |
|
[Subset by] text |
Filter by text description. |
|
Function Keys |
Description |
|
F4=Prompt |
Opens the Work with Object Links screen. Refer to the relevant IBM documentation for more details. |
|
F22=Enter entire directory |
Expands the free text Directory field to enter the full directory path. |
Executor Auto Identification
Use this option to identify the executor with a meaningful name. The executor is identified by a combination of the program and / or the user who executed the change.
The same executor can be defined by more than one program/user combination.
Once identified as an executor, it is possible to disregard the activity. This option provides:
-
Clarity regarding the actual executor of the transaction
-
Ability to work in an environment in which an active Change Management System (CMS) is working and Change Tracker is used solely to identify and track changes not made via the CMS. It is possible to eliminate such tracking information. To do so, set Keep activity in Change Tracker to N.
To define Executors Auto Identification, select 21. Executors Auto Identification from the General Definitions menu. The Work with Executors Auto Identification screen appears.
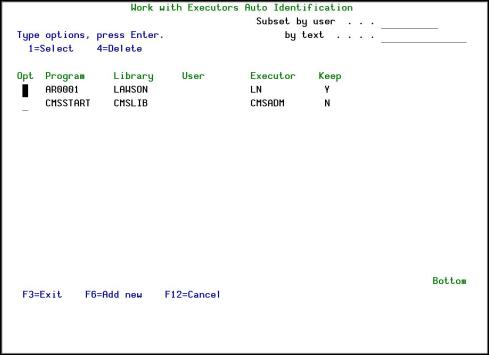
Figure 3-12. Work with Executors Auto Identification Screen
|
Options |
Description |
|
1=Select |
Modify the chosen executor. Perform the steps described in Adding or Modifying an Executor Auto Identification on page 26. |
|
4=Delete |
Deletes the chosen Executor Auto Identification. |
|
Function Keys |
Description |
|
F6=Add new |
Add a new Executor Auto Identification to track. |
Adding or Modifying an Executor Auto Identification
In the Work with Executors Auto Identification screen, select the executor you want to change, type 1 and press Enter, or press F6 to define a new executor. The appropriate screen appears.
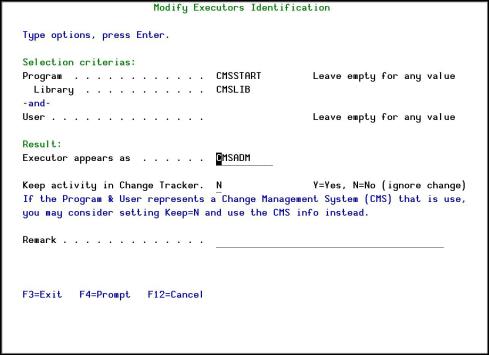
Figure 3-13. Modify Executors Identification Screen
|
Field |
Description |
|
Selection Criteria |
Opens the Modify Executors Identification screen. |
|
Program |
Filter by name of program. Leave empty for no filtering. |
|
Library |
Filter by name of library. Leave empty for no filtering. |
|
User |
Filter by name of user. Leave empty for no filtering. |
|
Result |
|
|
Executor appears as |
Name assigned to executor |
|
Keep activity in Change Tracker |
If the Program & User represents a Change Management System (CMS) that is use, you may consider setting N and use the CMS info instead. Y=Yes, N=No (ignore change) |
|
Remark |
Free text field to add remarks. |
|
Function Keys |
Description |
|
F4=Prompt |
Opens a prompt screen to select 1 or more executors. |
Environments
Environments help you classify activity on your system. They can either be an actual environment or a virtual environment to which one or more projects are assigned.
Environments are normally contained in dedicated libraries. Work with Environments defines which environments should be controlled and the attributes of the controls. Use Libraries to display current libraries assigned to the environment.
To work with Environments, select 31. Environments from the General Definitions menu. The Work with Environments screen appears.
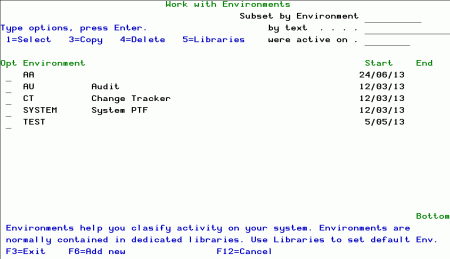
Figure 3-14. Work with Environments Screen
|
Field |
Description |
|
Environment |
Assign the changed objects to the environment. |
|
Start |
Start time |
|
End |
End time |
|
Options |
Description |
|
1=Select |
Modify an environment. |
|
3=Copy |
Copy an environment. |
|
4=Delete |
Delete an environment. |
|
5=Libraries |
Display current libraries assigned to the environment . |
|
Function Keys |
Description |
|
F6=Add new |
Opens a prompt screen to select 1 or more environments. |
Adding or Modifying an Environment
In the Work with Environments screen, select the environment you want to change, type 1 and press Enter, or press F6 to define a new environment. The appropriate screen appears.
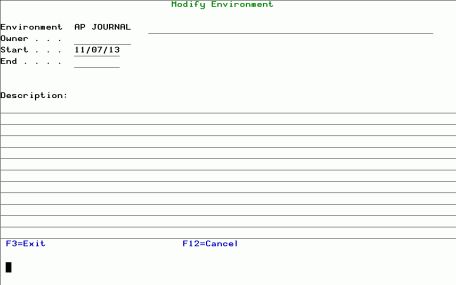
Figure 3-15. Modify Environment Screen
|
Field |
Description |
|
Environment |
Assign the changed objects to the environment. |
|
Owner |
Owner of the environment. |
|
Start |
Start time |
|
End |
End time |
|
Description |
Free text field to describe of environment. |
|
Function Keys |
Description |
|
F6=Add new |
Opens a prompt screen to select 1 or more environments. |
Projects
By classifying activities in terms of site-specific Projects, object and source changes can be viewed in a more meaningful manner.
To work with Projects, select 32. Projects from the GeneralDefinitions menu. The Work with Projects screen appears.
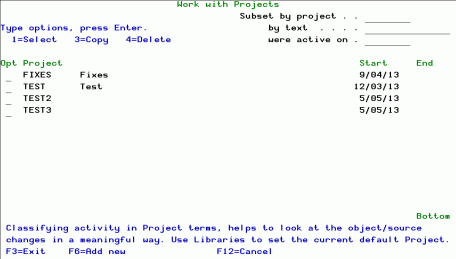
Figure 3-16. Work with Projects Screen
|
Field |
Description |
|
Project |
Name of the project |
|
Start |
Start time |
|
End |
End time |
|
Options |
Description |
|
1=Select |
Modify a project. |
|
3=Copy |
Copy a project. |
|
4=Delete |
Delete a project. |
|
Subset |
Filter by:
|
|
Function Keys |
Description |
|
F6=Add new |
Add a new project to work with. |
Adding or Modifying a Project
In the Work with Projects screen, select the project you want to change, type 1 and press Enter, or press F6 to define a new project. The appropriate screen appears.
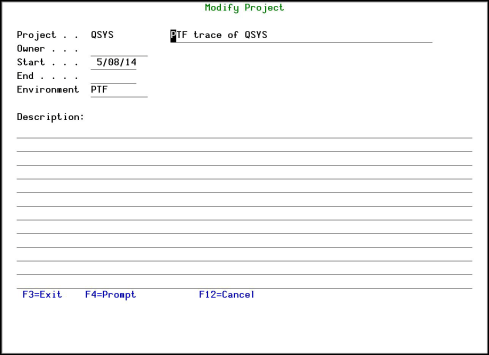
Figure 3-17. Modify Project Screen
|
Field |
|
|
Project |
Name of the project |
|
Owner |
Owner of the project |
|
Start |
Start time |
|
End |
End time |
|
Environment |
Environment the project is running in. |
|
Description |
Free text area to type descriptive information. |
|
Function Keys |
|
|
F4=Prompt |
Opens a prompt screen to select 1 or more projects. |
Executors
To define Executors, select 33. Executors from the General Definitions menu. The Work with Executors screen appears.
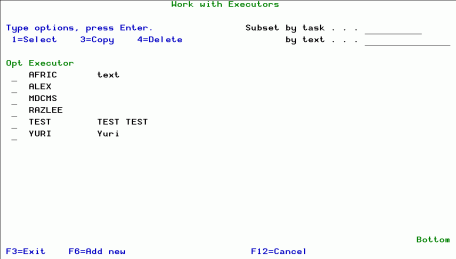
Figure 3-18. Work with Executors Screen
|
Options |
Description |
|
1=Select |
Modify an executor. |
|
3=Copy |
Copy an executor. |
|
4=Delete |
Delete an executor. |
|
Subset |
Filter by Task, Text |
|
Function Keys |
Description |
|
F6=Add new |
Add a new executor. |
Adding or Modifying an Executor
In the Work with Executors screen, select the executor you want to change, type 1 and press Enter, or press F6 to define a new executor. The appropriate screen appears.

Figure 3-19. Modify Executor Screen
|
Field |
Description |
|
Executor |
Name of the executor, followed by a free text entry field. |
|
Description |
Free text area to type descriptive information. |
|
Function Keys |
Description |
|
F4=Prompt |
Opens a prompt screen to select one or more executors (Add New Executor screen only). |
Time Groups
The description and steps for defining Time Groups are provided in the Audit User Manual.
General Groups
The description and steps for defining General Groups are provided in the Audit User Manual.