
Building Query Windows
Query windows are built interactively by filling in the window definition fields. The query window definition becomes effective immediately - no compilation is required.
To build, update or delete a query window, enter DFNWND *QUERY or DFNCSWND *PROMPT on the command line. The following screen is displayed:
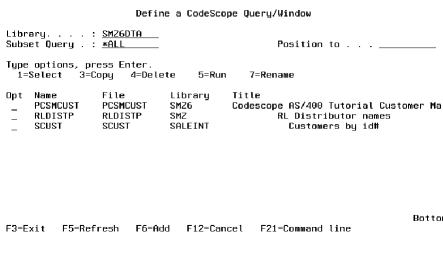
Options
More than one option can be chosen at the same time.
-
1 - Select: Update an existing query window definition.
-
3 - Copy : Copy a query window definition from an existing window definition.
-
4 - Delete : Delete a query window definition.
-
5 - Run: Activates a Window.
-
7 - Rename: Rename a query window definition.
Key Functions
-
F3 = Exit
-
F5 = Refresh
-
F6 = Add a new query window
-
F12 = Cancel
-
F21 = Command Line
Copy/Rename from
The name of the existing window that will be used for a copy or rename action.
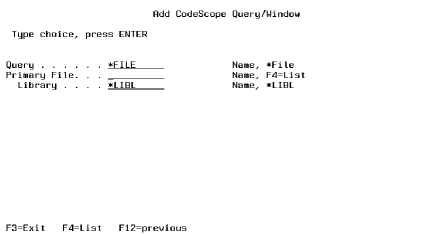
File
The name of the file displayed in the window.
F4
list of files within the library.
Library
Press Enter. The remainder of the window definition parameters are displayed.
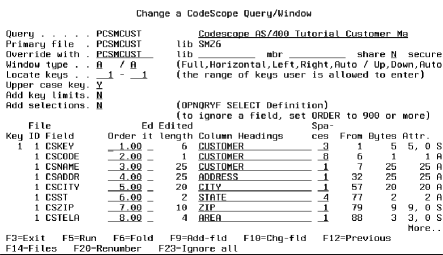
Window Title
Specify the title that will appear on the top bar.
Override
If you wish to display a file by referring to a different file/s definition, use the override feature to specify the override File, library, member, Share, and Secure parameters. For OPNQRYF (Open Query File) files, the SHARE parameter must be Y.
Window Type
This two part parameter determines the default window size and position on the screen. After the window is opened, the user can change window size and position by pressing function keys.
Size
F: Full Screen Window
H: Horizontal, half screen windows
L: Quarter size, left side of screen
R: Quarter size, right side of screen
A: Quarter size, automatic placement. The location on screen is determined by the position of the cursor at execution time. The window is displayed on the side of the screen opposite to the cursor. If the cursor is on the left side of the screen, the window displays on the right. If the cursor is on the right side of the screen, the window displays on the left.
Position
U: Up window displays at upper part of the screen.
D: Down widow displays on the lower part of the screen.
A: Automatic positioning. The horizontal positioning of the window is determined by the position of the cursor at execution time. The window is displayed on the part of the screen opposite to the cursor. If the cursor is on the upper half of the screen, the window displays on the lower half of the screen. If the cursor is on the lower half of the screen, the window displays on the upper half of the screen.

|
Fullscreen |
Quarter |
Half |
Quarter |
|
Left Up |
Screen Up |
Right Up |
|
|
Left Down |
Screen Down |
Right Down |
Locate keys
Specify which key fields can be accessed by the user for the purpose of positioning within the file. Up to eight key fields can be specified for positioning.
Example 1: For a Customer Order File keyed by Customer Number, Order Number and Line Number, the default range for the "Locate keys" parameter is 1 - 3. If the average customer order contains only a few line items, it would be advisable to omit the Line Number from the displayed key by changing the range to 1 - 2. This would make it easier for the user to reposition the file query by only keying two key field values, rather than three.
Example 2: In the example above, if you want to restrict the window to one particular customer, change the range to 2 - 3 and use the "Add Key Limits" option (the next parameter) to specify the Customer Number range limit.
Add Key Limits / Change Key Limits
N: No key limits apply to this query window.
Y: This lets you limit the window query display to a range of key values.
If this parameter is Y, then a window is displayed at the top of the screen which allows you to enter the key value range limits and the number of key fields to be checked.

Only records within the range that you specify are displayed in the window. Example: You wish to build a window that only shows records from the Product File with a key range of 4000000 to 7100000. By specifying those key limits, you will restrict the user from viewing any other records in the file.
Add Selections
Selecting 'Y' will bring up the criteria screen, to allow you to display only those records in your window.
Field Names
The data base field names are displayed at the lower half of the screen. Use the Roll keys to page through the list of fields.
If you accept the defaults, all data base fields will be available for display in the query window, as they appear in the external definition file. CodeScope supports a maximum of 25 fields per query window. You can modify the defaults by specifying:
Which fields to display in the window
The order in which the fields will be displayed
The number of spaces between fields
The field column headings.
You can also add internal fields not contained in the file's definition and you can modify the definition of any field - whether internal or external.
Order
The order in which the fields are displayed in the window can be specified by modifying the default "Order" value. To prevent a field from being displayed, enter an "Order" value greater than or equal to 900.
Spaces
This value represents the number of spaces between the end of this field and the beginning of the next. CodeScope begins with a default value that allows the entire column heading to be displayed with a delimiter symbol, " ", between each field. To shorten or lengthen the displayed field, modify the "Spaces" value.
A "Spaces" value of 0 causes the delimiter symbol to be eliminated, allowing you to connect separate fields together under one heading.
Column Headings
Column headings in the query window are displayed on two lines. Pressing the fold/unfold function key will let you modify both lines of the headings. In the "unfold" mode, the third line under "Column Headings" is available for comments.
What are Internal Fields?
CodeScope lets you define additional fields that can be displayed in a query window file. Internal fields can be defined for files without external definitions (DDS), as well as for files with external definitions. This is especially useful in allowing you to build windows to query files without external definitions. For files containing large fields, you can split the large fields into smaller ones to ease viewing in a query window. Creating new fields does not affect the external definition file.
Creating an Internal Field
From the Define Window Screen, press F9 to define a new internal field. CodeScope opens a window at the top of the screen allowing you to define the field. You are prompted for field name, type, starting position, length, decimals and column headings. While defining a new internal field, you can also use Page Up and Page Down keys to review the currently defined fields.
Valid field types are:
A: alphanumeric
B: binary
P: packed
S: signed
The new field is added at the beginning of the query window's fields.
Changing Field Definitions
CodeScope allows you to change the field definition of both externally and internally defined fields. These changes do not affect the file's external definition.
To change the definition of a field, press F10 from the Define Window screen. CodeScope prompts you for the name of the field to be changed and responds with a display of the current definition, allowing you to change it.
To remove an internal field definition from the query window, change the "Order" number to a value greater than or equal to 900.00
Press the Exit function key to exit the window definition process.
Join Query File Manager
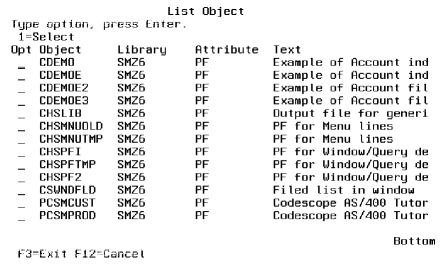
F14 (Files) from the CodeScope Query/Window screen guides you to a list of files.
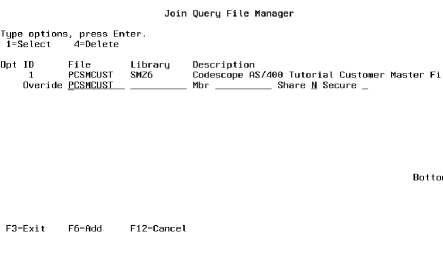
A File can be changed, deleted or added from this screen. A file is added by using the F6 Command.

A "Select file" window will appear. The user then enters the file name. F4 can be used to display a list of files.
Once a file has been defined the "Join Fields" screen will appear with a list of key fields for this file.
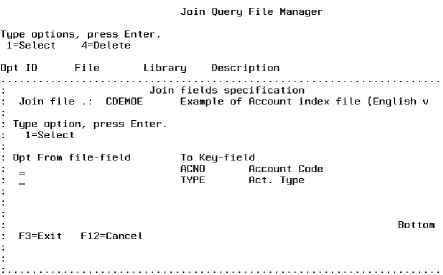
At least one of the fields must be selected, a window will appear with a list of suitable fields. One of these fields must be selected to join the two files together. Once the fields have been selected, press Enter to return to the list of files. F3 will end the process of the addition with a choice of "yes" or "no" for accepting the file selection, Returning to the CodeScope Query/Window screen which then shows all fields from all the files defined.
Display Selected Records to Include
The Add Selection Criteria Screen is shown if the 'Add selections' is set to 'Y' from the Change a CodeScope Query/Window screen.
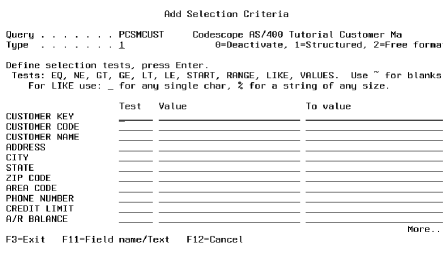
Through the feature of CodeScope, a working set of records can be defined, eliminating those records that physically exist but are not necessary for the subsequent operations. The "Display Selected Records" is implemented through a high level interface to the OPNQRYF (Open Query File) command.
Records are dynamically selected based upon the specified tests.
Internal fields which do not cross the field boundaries i.e. start and finish within one external field) can be used in selection tests for a record selection.
No significant delay is encountered, unless the specified selection defines a small number of records in a large file.
Types of Selections
There are 2 types of selection interfaces available in CodeScope.
Structured Style
Structured Style provides a list of field names or descriptions in the user interface along with selection tests. When multiple selection tests are used the relationship between them is an AND relationship. It is only possible to use each field for one test.
Free Format
Free Format enables the entry of the query selection string to be used for the OPNQRYF. This is very useful for more complex selection criteria. The selection criteria can be created initially in Structured Style to obtain the correct syntax and then enhanced in free style.
Changing Style
It is possible to change between styles while a SUBSET is being defined. This may result in the loss of some selection criteria when moving to a style (such as Structured Style) which does not support all features, which have been used.
Test Types
|
LIKE |
The field contains, starts or ends with a character or a string of characters. Wild cards are supported for single character and string of any length. A detailed explanation follows |
|
START |
Field starts with characters |
|
RANGE |
Limit from... -to ... |
|
EQ |
Equal to |
|
NE |
Not equal to |
|
GT |
Greater than |
|
GE |
Greater than or equal to |
|
LE |
Less than |
|
VALUES |
Field equals one of the values supplied (only one value is required) |
LIKE Test
The LIKE test is similar to the one used in IBM QUERY. This test helps to find strings in the character files. The "%" sign replaces a string of characters, of any length. The sign "_" replaces any single character. The special signs used can be changed - see Product Defaults.
If we are looking for the name "DAVID" which appears somewhere in the name field, we will use the find option as follows: NAME LIKE %DAVID% The result - the Displayed Selection will contain all the records containing "DAVID" regardless of where this appears in the field.
Upper and Lower Case Differences
Upper and lower case differences are ignored (default). Optionally the differences in pronunciation of the same letter can also be ignored. See Product Defaults.