
Chapter 12: Creating a New File
FileScope allows you to create an entirely new file based on one or more existing files. This powerful tool also supports date and Euro conversions for existing database files. This conversion can apply to standard date fields (type L), standard numeric fields (type S), or character fields (type A).
It is possible to use this process to enlarge numeric fields, add new fields, change attributes such as titles, and so on. Furthermore the process can be used to create new files, the information of which can be a combination of fields from several joined files. Other fields can be the result of calling a user external program (functions).
The converted file can include just part of the existing records.
These abilities enable, for example, the easy removal of unnecessary historical records from the files. It is also possible to redefine key fields.
File Creation Feature Highlights
-
Conversion of data and time structures to type: L, T, Z or regular numeric date
-
Addition of new fields (Calculated, result of external function)
-
Change of key structure, key order and file classification
-
Determination of record scope to pass to the converted file
-
Changing the column headings of the field names in DDS
-
Determine the number of records to copy to build test files
-
Save the new file definition in a Viewpoint, in order for the data to be converted or copied at any required time either interactively or in batch mode
Create New File
-
From the FileScope Main menu, use option 2. Change file to select a file.
-
In the Change File screen, press F13 for the Service Menu, and select 91. Create New File. The menu below presents a variety of options:
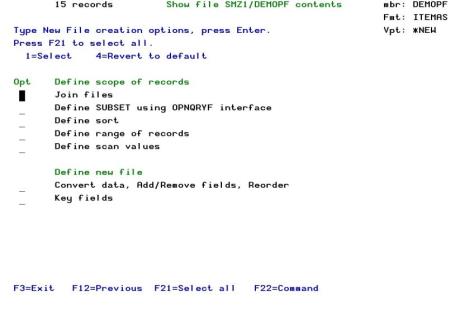
Define scope of records
Use the Define scope of records command to select the records to be converted and then copied to the new file.
NOTE: The newly converted file may contain fields from joined files as well.
Define New File
Use the Define New File to specify data conversion requirements, to reorder fields, to add or remove fields and to define key fields before you create the newly converted file.
Before creating the newly converted file you can:
-
Convert date and time structures,
-
Reorder fields
-
Ignore fields
-
Resize fields
-
Add new fields (calculated, formulas, external functions),
-
Integrate data from joined files
Run the Conversion
The file conversion requires a specific confirmation of run choices.
Explanation of Function Keys:
F3 = Exit
Press F3 to exit the menu and to return to FileScope
F12 = Cancel
Press F12 to exit the menu and return to the multi-record display.
F21 = Select all
Press F21 to select all options in one time.
F22 = Command
Press F22 to prompt the OS command line.
Define Scope of Records
Use the Define Scope of Records to select the records to be copied to the new file.
NOTE: The new file may contain fields from joined files.
Join Files
This option allows the user to join up to 9 files to one flat record and to select fields to be used into the new converted file from more than one file.
Define SUBSET using Interface
Specify the selection criteria in the OPNQRYF interface. All further activities are on the imaginary file that is built from just these records.
Define Sort
Determine the order of records in your newly converted file. The records are sorted according to the key specifications.
Define Range of Records
Define the range of records to be selected from the file. The range is defined by the relative record numbers of the first and last records in the range or by the keys of the first and last record in the range.
Define Scan Values
Using the internal scan capabilities of the product can filter the record in the scan criteria.
Define New File
Use the Define New File to specify data conversion requirements, to reorder fields, to add or remove fields, to define key fields before you create the new, converted file.
Before creating the new, converted file you can:
-
Convert date and time structures
-
Reorder fields
-
Ignore fields
-
Resize fields
-
Add new fields (calculated, formulas, external functions)
-
Integrate data from joined files
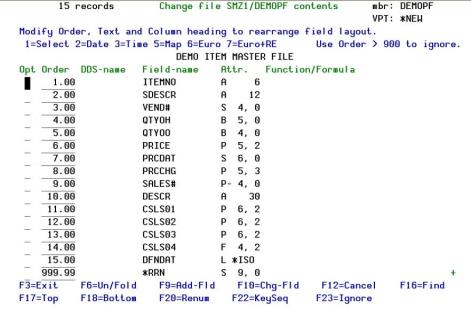
Convert Data, Add/Remove Fields, Reorder
This screen displays the field names, attributes, titles, and so on, which have been taken from the file(s) definition.
You can convert the data of date and time fields, change the length of the fields, the order of the fields, the column heading and the text fields. You can also add new field definitions in which the data can be the result of calculation, formulas and calls to external functions.
These modifications apply to the screen and ONLY affect the way in which data has been displayed. This should be taken in account only after executing the Confirm and Running Conversion option.
The special fields *RRN and *RCD are automatically added to the record fields to contain the relative record number and the unedited record string respectively.
|
Option |
Description |
|---|---|
|
1=Select |
Use to make modifications on this field such as: Column Heading and Text. |
|
2 = Date |
To convert any input date format to any output year format. |
|
3 = Time |
To convert any input time format to any output time format. |
|
5 = Map |
Used for re-sizing any input field in DDS. |
|
6=Euro |
|
|
7=Euro+RE |
|
|
Order |
The numerical value entered here determines the order in which the fields should be displayed and copied into the new converted file. If ORDER is equal to or greater than 900.00, the field is not displayed and, therefore does not exist in the output converted file. |
|
DDS-name
|
If this is blank the Field Name is taken as the DDS name. |
|
Field-name
|
The DDS name of the current files. |
|
Attr |
Attributes of the field. For example, data type, length and number of decimal places. |
|
Function/Formula |
Origin of the field (blank – externally defined field) AUTO = Imaginary field added automatically by the product INT = Internally Calculated Field CLC = Calculated Field specified by a formula and include brackets. |
Explanation of Function Keys
|
Option |
Description |
|
|
F3 |
Exit |
|
|
F6 |
Unfold = Display more information |
|
|
F9 |
Add Fold = Add internal Fields |
|
|
F10 |
Chg-Fld = Change Internal Fields |
|
|
F12 |
Cancel = Return to the date and file conversion menu |
|
|
F20 |
Renumber by location |
|
|
F23 |
Ignore = Omit selected fields or include unselected fields |
|
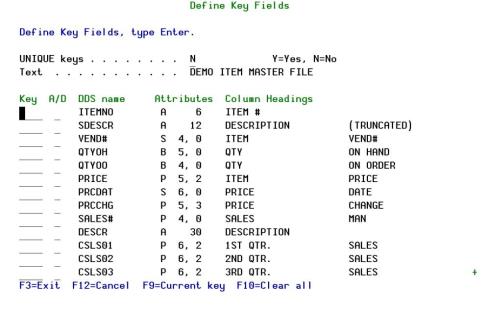
Key Fields
This screen displays the fields that are currently defined as Sort fields.
You can then select the fields you want to see as field keys in your new file.
|
Option |
Description |
|
|
Key |
Displays the current key order, which is initially the key order of the input file. Type here the new order for sorting your output file. |
|
|
A/D |
To sort the field in ascending or descending order |
|
|
DDS Name |
The output file DDS field name |
|
|
Attributes |
The field attributes |
|
|
Column Headings |
The field column heading |
|
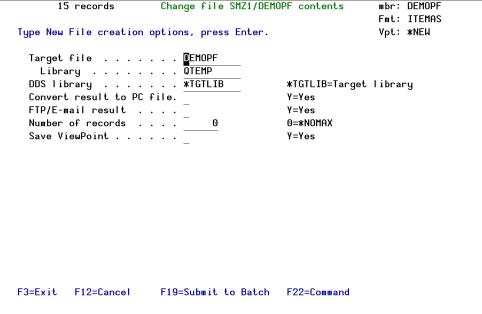
Running the Conversion
The date format file conversion requires a specific confirmation of run choices.
Confirm and run the conversion
|
Option |
Description |
|
|
Target File |
Name of the file where the Conversion results have to be directed. |
|
|
Library |
Enter the name of the library (where the file is created) |
|
|
DDS Library |
Enter the name where the DDS of the file is created. (*TGTLIB = same as the File Library) |
|
|
At end, send to PC file |
The name of the file to which the conversion results are directed. |
|
|
Folder |
Folder to contain the PC file |
|
|
Number of records |
Number of records to be reported into the converted file (0 = the entire file) |
|
|
Save Viewpoint |
The modified layout can be saved as a Viewpoint |
|
|
F19 |
Submit to batch – When pressing this key, a screen is displayed for you to specify the date and the time the job should be run |
|
|
F22 |
Command = The OS command line |
|