
Chapter 24: File Information
Additional file information can be conveniently viewed from within FileScope by selecting options from the Service menu. Enter F13 from either the multi-record single records screens for the Service menu.
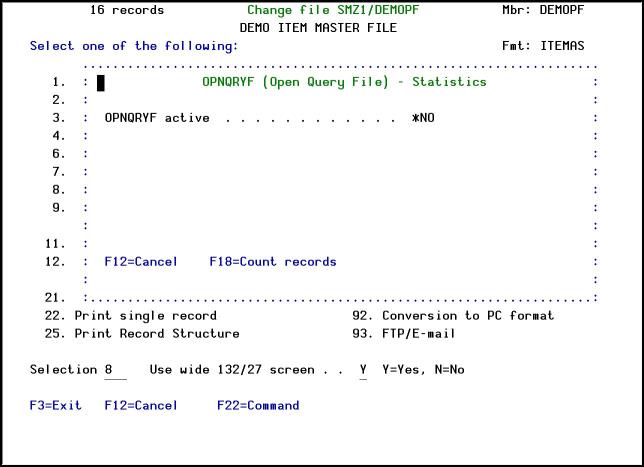
OPNQRYF Statistics
-
Select 8. Statistics in the Service menu to display OPNQRYF statistics.
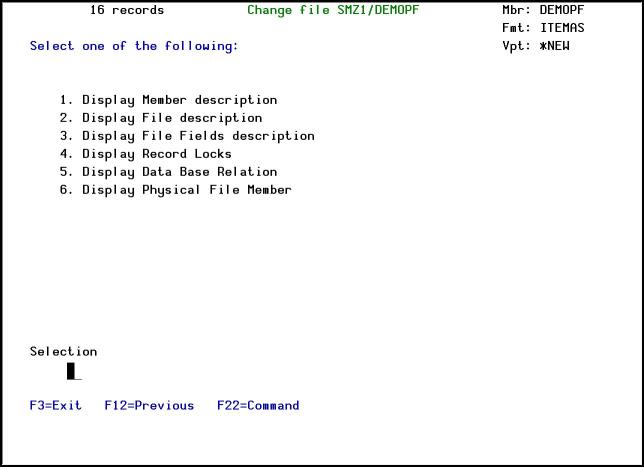
File Information
-
Select 51. File information off the Service menu to display file information.
Chapter 25: Configuration and Maintenance
System Configuration
This section reviews the process of setting general configuration for FileScope.
To reach this screen, select 81. System Configuration from the main menu. The Define FileScope Platinum defaults screen appears.
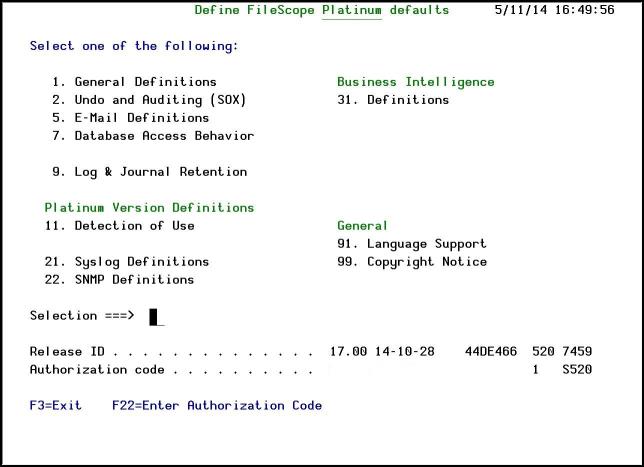
Define FileScope Platinum defaults
General Definitions
This option presents general definitions relating to number of records to print, records display, Single Record and more.
-
Select 1. General Definitions from the Define FileScope Platinum defaults menu. The General Definitions screen appears.
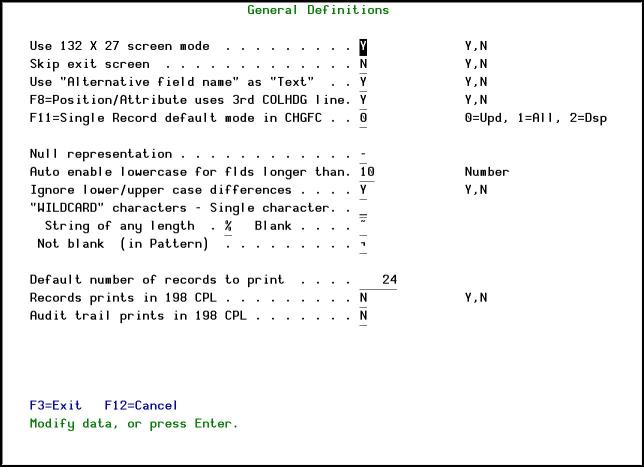
General Definitions
|
Option |
Description |
|---|---|
|
Use 132 x 27 screen mode |
Y = Use the wider screen mode N = Use the standard 80 x 24 screen mode |
|
Skip exit screen |
Y = Do not show the exit screen when leaving FileScope N = Show the exit screen when leaving FileScope |
|
Use “Alternative field name” as “Text” |
Y N |
|
F8=Position/Attribute uses 3rd COLHDG line. |
Y = Use the third column heading line for the position/attribute of the field N = Do not use the third column heading line for the position/attribute of the field |
|
F11=Single Record default mode in CHGFC |
0 = Update 1 = All 2 = Display |
|
Null representation |
The character that is displayed instead of null |
|
Auto enable lowercase for flds longer than. |
The length of fields for which lowercase is automatically enabled. |
|
Ignore lower/upper case differences |
Y = Use the wider screen mode N = Use the standard 80 x 24 screen mode |
|
"WILDCARD" characters - Single character |
The character to represent a single WILDCARD character in a search. |
|
String of any length |
The character to represent a string of any length in a search. For example, if your search key is A%R, then both AFTER and |
|
Blank |
The character to represent a single blank character in a search. |
|
Not blank (in Pattern) |
The character to represent a single non-blank character in a search. |
|
Default number of records to print |
The number of records to print when printing the file. |
|
Records prints in 198 CPL |
Y = Print the reports using 198 characters per line N = Print the reports using 132 characters per line |
|
Audit trail prints in 198 CPL |
Y = Print the audit trails using 198 characters per line N = Print the audit trails using 132 characters per line |
-
Set the parameters according to your organization’s needs and press Enter.
Undo and Auditing (SOX)
This option presents definitions for audit trail and tracing and SOX compliance setup.
-
Select 2. Undo and Auditing (SOX) from the Define FileScope Platinum defaults menu. The Undo and Auditing screen appears.
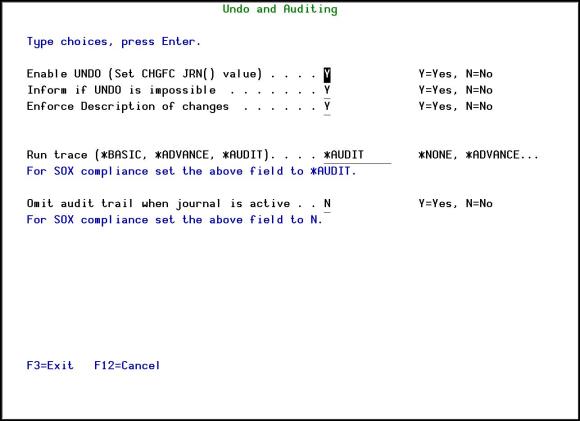
Undo and Auditing Definitions
|
Option |
Description |
|---|---|
|
Enable UNDO (Set CHGFC JRN() value) |
Y, N Sets the default for the Journal changes parameter of the CHGFC command. |
|
Inform if UNDO is impossible |
Y, N |
|
Enforce Description of changes |
Y, N Set to Y to ensure that every change is documented with a description. |
|
Run trace (*BASIC, *ADVANCE, *AUDIT) |
For SOX compliance, set this field to *AUDIT. |
|
Omit audit trail when journal is active |
Y, N For SOX compliance, set this field to N. |
-
Set the parameters according to your organization’s needs and press Enter.
Email Definitions
Set definitions for sending email notifications.
-
Select 5. E-Mail Definitions from the Define FileScope Platinum defaults menu. The E-mail Definitions screen appears.
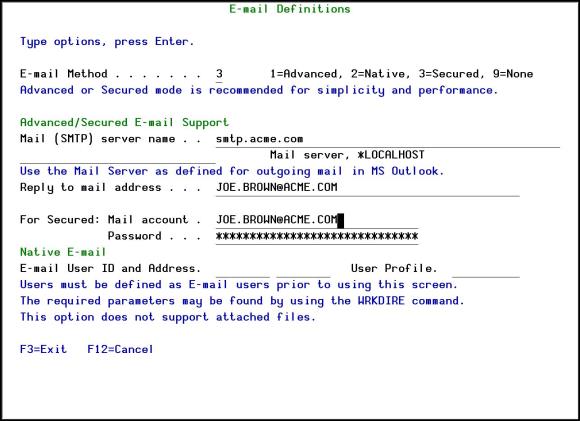
Email Definitions
|
Option |
Description |
|---|---|
|
E-mail Method |
1 = Advanced 2 = Native 3 = Secured 9 = None Use Advanced or Secured mode for simplicity and performance. |
|
Mail (SMTP) server name |
If you enter 3 as the email method, this is the outgoing mail server. |
|
Reply to mail address |
If you enter 3 as the email method, this is the reply to email address that is used. |
|
For Secured: Password . . . |
If you enter 3 as the email method, this is the email address and password that is used. |
|
E-mail User ID and Address. |
If you enter 2 as the email method, this is the email address and User ID that are used |
-
Set the parameters according to your organization’s needs and press Enter.
Database Access Behavior
Define the way you access your database.
-
Select 7. Database Access Behavior from the Define FileScope Platinum defaults menu. The Database Access Behavior screen appears.
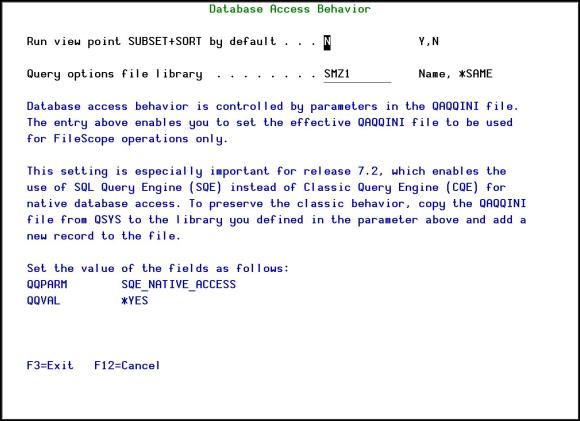
Database Access Behavior
|
Option |
Description |
|---|---|
|
Run view point SUBSET+SORT by default |
Y N |
|
Query options file library |
Database access behavior is controlled by parameters in the QAQQINI file. This field enables you to set the effective QAQQINI file to be used for FileScope operations only. This setting is especially important for release 7.2 and later of the operating system, which enables the use of SQL Query Engine (SQE) instead of Classic Query Engine (CQE) for native database access. To preserve the classic behavior, copy the QAQQINI file from QSYS to the library you defined in this parameter and add a new record to the file. Set the values of the fields as follows:
QQPARM SQE_NATIVE_ACCESS QQVAL *YES |
-
Set the parameters according to your organization’s needs and press Enter.
Log & Journal Retention
Define retention periods for logs and journals. These periods are important for SOX compliance.
-
Select 9. Log & Journal Retention from the Define FileScope Platinum defaults menu. The Log & Journal Retention screen appears.
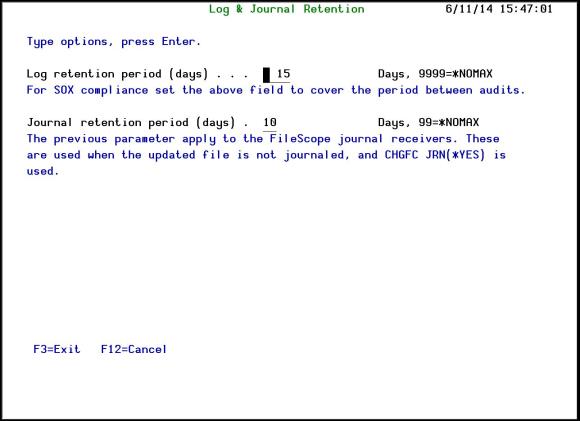
Log and Journal Retention Definitions
|
Option |
Description |
|---|---|
|
Log retention period (days) |
Days, 9999=*NOMAX For SOX compliance, set this field to cover the period between audits. |
|
Journal retention period (days) |
Days, 9999=*NOMAX This parameter is used for the FileScope Journal receivers. These receivers are used when the updated file is not journaled and CHGFC JRN(*YES) is specified. |
-
Set the parameters according to your organization’s needs and press Enter.
Detection of Use
You can set up parameters that allow you to be notified whenever FileScope is used to show or change files. You can send the notification at the beginning of the command use, the end of the command use, or you can also add trace and audit messages. You can send to one or more of a message queue, SYSLOG, an email address and a JOURNAL entry in QAUDJRN.
-
Select 11. Detection of Use from the Define FileScope Platinum defaults menu. The Detection of Use of Product screen appears.
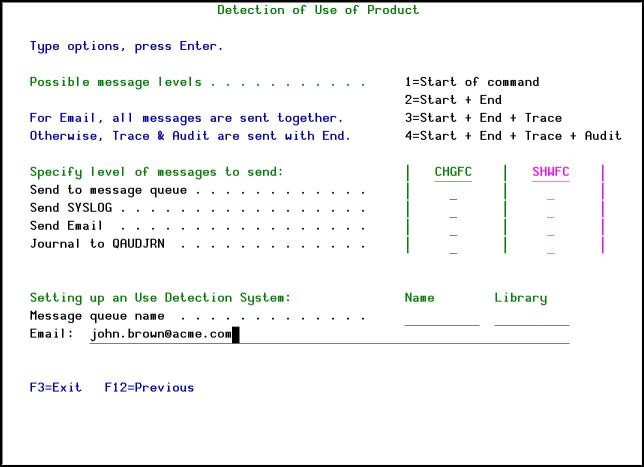
General Definitions
|
Option |
Description |
|---|---|
|
Level of message to send |
Set a level of message for each possible message option for both CHGFC and SHWFC. 1 = Start of the command 2 = Start and End of the command 3 = Start and End and Trace 4 = Start and End and Trace and Audit |
|
Message queue name |
The message queue name and library to receive the messages |
|
|
The email address to receive the messages |
-
Set the parameters according to your organization’s needs and press Enter.
SIEM Support
Numerous iSecurity products integrate with SEM/SIEM systems by sending security alerts instantaneously to these systems; web-based alerts are supported using Twitter www.twitter.com (can transmits up to 1000 lines per second). Message alerts contain detailed event information about application data changes, deletes or reads or objects and files, emergency changes in user authorities, IFS viruses detected, malicious network access to the IBM i, and more.
Use FileScope Platinum to set SIEM general alert definitions.
SYSLOG
This feature sends different events from the IBM i different facilities (such as logs and message systems) to a remote SYSLOG server according to a range of severities: emergency, alert, critical, error, warning and so on.
You can define whether to send SYSLOG message, to which IP address, from which facility (list of optional facilities below), and to which message structure
-
Select 21. Syslog Definitions from the Define FileScope Platinum defaults menu. The Syslog Definitions screen appears.
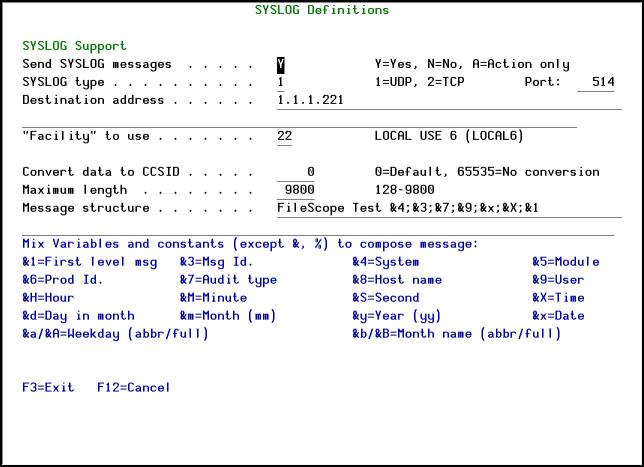
SYSLOG definitions
-
Set parameters and definitions according to the organization needs and press Enter.
&0 or &2 can now be used as last parameter in SYSLOG format.
&0 = bytes 1-9800 in USRDTA (9800 bytes)
&2 = bytes 1101-9800 in USRDTA (8700 bytes)
Notes:
1. These fields are not converted to ASCII.
2. SYSLOG manager must set maximum message length from default (1024) to expected size (10000).
3. SYSLOG manager must take care of non-printable characters option.
** SYSLFC - SYSLOG FACILITY:
-
USER-LEVEL MESSAGES
-
MAIL SYSTEM
-
SYSTEM DAEMONS
-
SECURITY/AUTHORIZATION MESSAGES
-
SYSLOGD INTERNAL
-
LINE PRINTER SUBSYSTEM
-
NETWORK NEWS SUBSYSTEM
-
UUCP SUBSYSTEM
-
CLOCK DAEMON
-
SECURITY/AUTHORIZATION MESSAGES
-
FTP DAEMON
-
NTP SUBSYSTEM
-
LOG AUDIT
-
LOG ALERT
-
CLOCK DAEMON
-
LOCAL USE 0 (LOCAL0)
-
LOCAL USE 1 (LOCAL1)
-
LOCAL USE 2 (LOCAL2)
-
LOCAL USE 3 (LOCAL3)
-
LOCAL USE 4 (LOCAL4)
-
LOCAL USE 5 (LOCAL5)
-
LOCAL USE 6 (LOCAL6)
-
LOCAL USE 7 (LOCAL7)
**SYSLSV - SYSLOG SEVERITY :
1 = EMERGENCY - ALERT
2 = EMERGENCY - CRITICAL
3 = EMERGENCY - ERROR
4 = EMERGENCY - WARNING
5 = EMERGENCY - NOTICE (SIGNIFICANT)
6 = EMERGENCY - INFORMATIONAL
7 = EMERGENCY - DEBUG
SNMP Definitions
You can define whether to generate SNMP traps
-
Select 22. SNMP Definitions from the Define FileScope Platinum defaults menu. The SNMP Definitions screen appears.

SNMP Definitions
-
Type to generate SNMP traps to monitor network attached devices for conditions that warrant administrative attention and press Enter.
NOTE: The selection which messages to send is taken from the SYSLOG definition screen.
Business Intelligence Definitions
-
Select 31. Definitions from the Define FileScope Platinum defaults menu. The Business Intelligence screen appears.
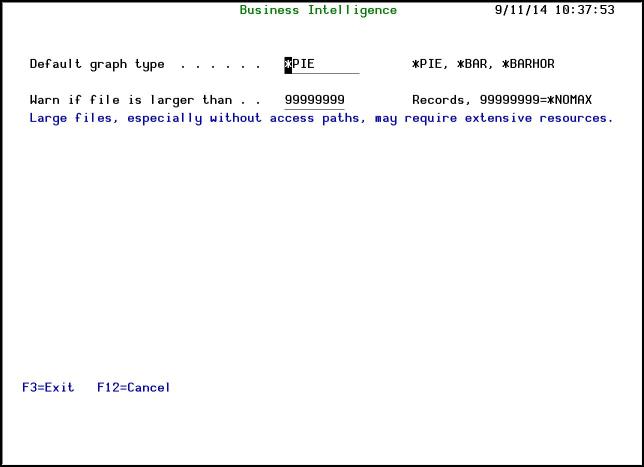
Business Intelligence Definitions
|
Option |
Description |
|---|---|
|
Default graph type |
Define the default graph type: *PIE = Pie chart *BAR = Bar graph *BARHOR = Horizontal bar graph |
|
Warn if file is larger than |
Working with large files takes up extensive computer resources. Set the file size above which the system displays a size warning. |
-
Set parameters and definitions according to the organization needs and press Enter.
Maintenance
From the maintenance menu, you can synchronize the way you work with FileScope on different computers.
Viewpoints
You can export and import FileScope viewpoints from one computer to another and also between LPARs on the same computer.
Export
To export FileScope viewpoints:
-
Select 1. Export from the Maintenance Menu. The Export FileScope ViewPoints screen appears.
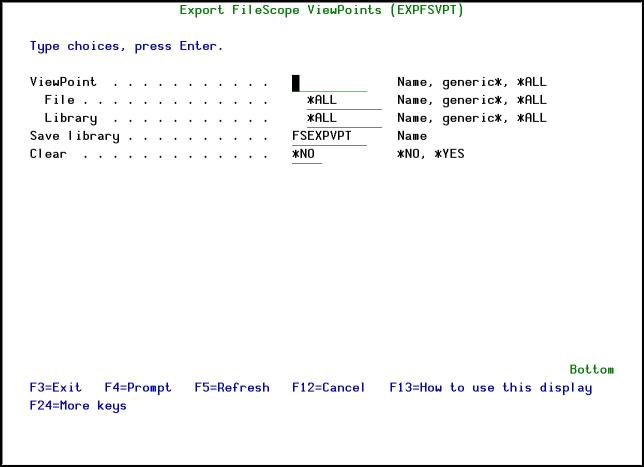
Export FileScope ViewPoints
|
Option |
Description |
|---|---|
|
ViewPoint |
The name of the ViewPoint being exported. |
|
File |
The file for the ViewPoint |
|
Library |
The library for the ViewPoint |
|
Save library |
The name of the save library where you are saving the ViewPoint |
|
Clear |
*YES/*NO Define if previous exported definitions should be cleared before exporting the new current ones. |
-
Set parameters and definitions according to the organization needs and press Enter. The ViewPoint is exported.
Import
To import FileScope viewpoints:
-
Select 2. Import from the Maintenance Menu. The Import FileScope ViewPoints screen appears.
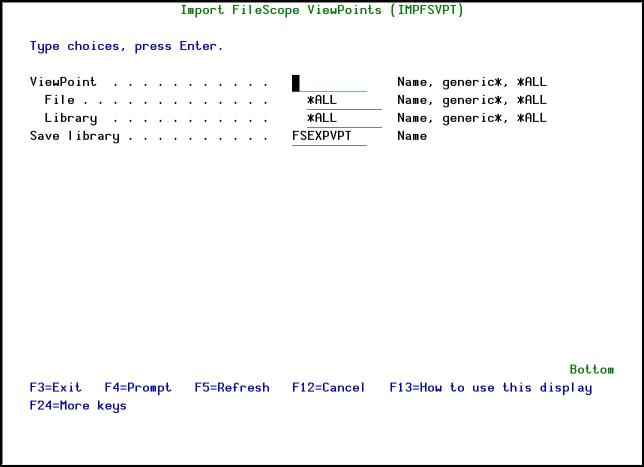
Import FileScope ViewPoints
|
Option |
Description |
|---|---|
|
ViewPoint |
The name of the ViewPoint being imported |
|
File |
The file for the ViewPoint |
|
Library |
The library for the ViewPoint |
|
Save library |
The name of the save library where the ViewPoint was saved |
-
Set parameters and definitions according to the organization needs and press Enter. The ViewPoint is exported.
Uninstall
To uninstall FileScope, select 91. Uninstall from the Maintenance Menu, and follow the instructions.
BASE Support
The BASE Support menu enables you to work with various settings that are common for all modules of iSecurity. This menu, with all its options, is in all iSecurity major modules. To access the BASE Support menu, select 89. BASE Support from the FileScope main menu.
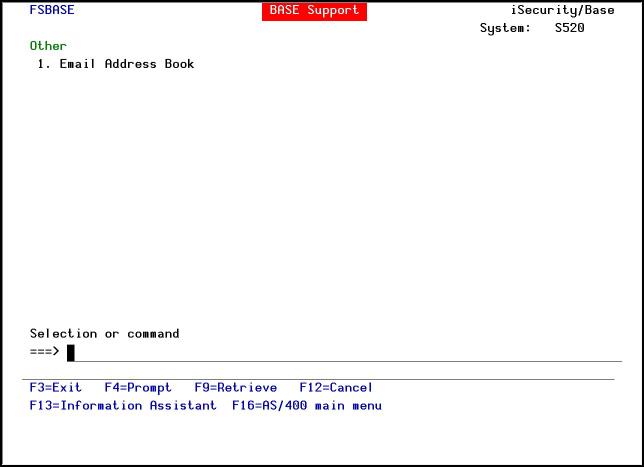
Figure 181: BASE Support
Other
Email Address Book
You can define the email address to be used for each user profile. You can also use this option to define an email group, with multiple addresses.
-
Select from the BASE Support menu. The Work with Email Address Book screen appears.
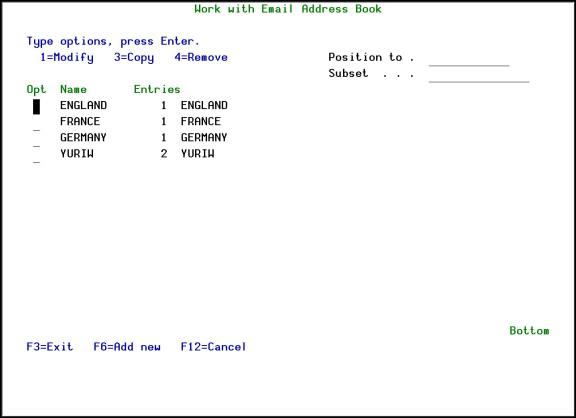
Work with Email Address Book
-
Press F6 to add a new address entry (or type 1 next to a name to modify it). The Add Email Name screen appears.

Add Email Name
-
Enter a , , and all the associated email addresses and press .