
Chapter 5: The Change File Command
Multi-record File Maintenance
Full Screen Update
Available in FileScope Platinum only
-
Change an input field or fields by typing over the displayed data. Press ENTER to open a window on the next row. The cursor can also be moved up or down.

This is done so that the user is free to choose the next record on the screen to be changed. ENTER opens the window on the chosen record.
F5 = Refresh the window
F10 = Updates the changed records.
If the internal journaling system is active, you should enter text describing the planned group of updates so you can identify the changes if they need to be revoked. If the internal journaling system is not active, a warning message is displayed. Pressing ENTER completes the update of the records and leaves the update mode.
-
After modifying the last displayed record, the process is completed exactly like F10. F12 = Returns the user to the update mode without updating the records and a warning appears. Press F12 again to exit without updating. To return to update mode press ENTER.
-
By pressing the F6 key and selecting the SPLIT SCREEN mode you can edit records from two files simultaneously.
Global Changes
Through global changes, it is possible to perform the following operations on a set of records:
-
Update / Add / Copy / Delete
-
Correct numeric errors (decimal errors) automatically
-
Create partial files (“OUTFILE” Concept)
-
Copy selected data to other files
-
Many requests no longer need to be programmed they can be automatically processed very quickly. Just specify your requirements and FileScope does the rest.
-
It is now possible to do the following:
-
Define a set of records, which contain a given text
-
Update Changes in the PRICE field by a given percentage
-
Update the original record
More complicated requests can be processed just as easily, for example:
-
Define a SUBSET – locally manufactured items containing a given text, with a price less than a given amount
-
In Key Range – Characterizing items manufactured locally
-
Select – Only those items which have ‘4’ as third digit.
-
Correct Decimal Errors – If any
-
Modify Values add 10% to “PRICE”, set “PRICE CHANGE DATE” to first of the month
-
Update the file by adding records to a newly created file
-
The ‘Global Change’ is an option selected from the SERVICE MENU.
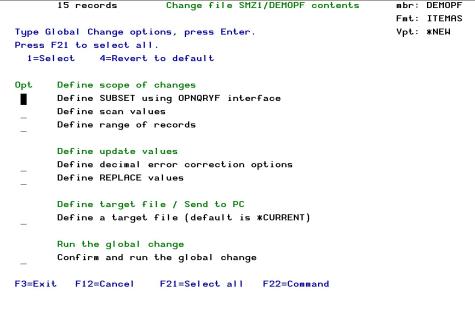
Defining the records to be changed
The records to be updated are defined as a range within a defined subset, selecting only the records that comply with the scan criteria. The default range is all the records in the file.
SUBSET definition
For a description of the SUBSET function, see Work with Subsets on page 1.
Single Record File Maintenance
To alter a record, locate and display it on a Single Record Screen. Place the curser on it and press F11.

The single record screen is now in the UPDATE MODE. You can ADD, CHANGE, and DELETE records while in the User Choice mode by pressing the appropriate command key. Alternatively, you can select a single record mode of ADD, CHANGE, or DELETE and change the file by pressing ENTER. The other available modes are SINGLE RECORD DISPLAY, MULTI-RECORD DISPLAY, and MULTI-RECORD UPDATE.
The first change made to the file (ADD, CHANGE, or DELETE) while using the single record screen either gives a warning that the file is not being journaled, or requests descriptive text about the changes.
Single Record Update
User Choice Mode
To update a record, type over the displayed data of that record and press F10. The fields are displayed and entered in the actual size.
After pressing F10, if the internal journaling system is active, you should enter text describing the planned group of updates so that you can identify the changes more easily, in case they need to be revoked. If the internal journaling system is not active, a warning message is displayed. Pressing ENTER completes the update of the records and leaves the update mode. F12 returns the user to update mode without saving. This window is then displayed just one time for each group of changes.
A confirmation request appears before each update operation.
Update Mode
Change to Update Mode using the F6 key. Using either the single record screen or the multi-record screen, select 4 and press ENTER.
The steps are the same as for the User Choice Update, except that ENTER should be pressed to update a record instead of F10.
Update in Hexadecimal
Data can also be altered through hexadecimal representation. Press F21 to add hexadecimal representation.
Logical Files with Select/Omit Consideration
Updating/Adding records in a logical file with Select/Omit criteria may cause the records to be removed from the currently used file due to selected criteria.
Audit Trail Report
All changes made to a file are automatically logged to an audit report. The “before” and “after” image of each record is listed, along with field titles and formatted fields. The report highlights changes by printing an asterisk next to the fields in which the value has changed. If a field contains unprintable characters, the hexadecimal representation of that is printed
Single Record - Add
To write a new record, replace the contents of the displayed record and press F9. To add an empty record, move to the end of the file (*EOF is displayed instead of data) and press F9.
For the first record in a set of updates, the journal window appears, informing you whether the internal journaling system is active. If it is active, you are requested to enter text describing the planned group of updates that can help you to identify this in case it should be revoked.
Adding an Empty Record
If you add a record while End-of-File is being displayed, an empty record is added to the file.
Add Mode
Change to Add Mode using F6 from either the single record screen or the multi-record screen. Select 6 and press ENTER.
The steps are the same as “USER CHOICE ADD”. Except that
ENTER should be pressed to add a record instead of F9.
Single Record – Delete
User Choice Mode
Press F23=Delete record, to delete the record that is displayed. The journal window appears, informing you whether the internal journaling system is active. If it is active, you are requested to enter text describing the planned group of updates so that you can identify them in case it should be revoked. This window is displayed just once for each group of changes.
Delete Mode
Change to Delete Mode using F6 from either the single record screen or the multi-record screen. Select 7 and press ENTER.